Why You Should Drain Your Hot Water System
Regularly draining sediment from your hot water system is critical for maintaining efficiency and extending its lifespan. Experts recommend understanding how to flush out your hot water system, ideally doing so at least annually, especially in areas with hard water.
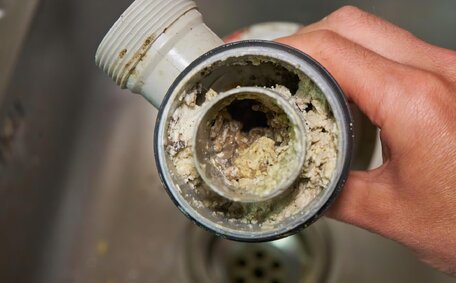
Over time, a bottom tank can become the repository for much sediment and mineral deposits, accumulating gradually. When buildup occurs, it entraps heat, causing your system to work harder and use more energy than necessary. A licensed plumber would affirm, draining the tank helps remove these deposits before they become problematic.
Annual flushing cleans the system and enables checks for leaks, pressure relief valve issues, and pipework or connection problems. Promptly turn hot water issues into proactive fixes to prevent more costly repairs down the track.
You might wonder how to drain the system yourself; fortunately, it’s a manageable DIY task. However, in case of complications or if you own an electric system, don’t hesitate to call a professional plumber who can prevent actions that might inadvertently cause harm to your device.
Taking this preventative measure maximises efficiency, saving you money on energy bills over the long run. More importantly, it avoids failures or breakdowns that can leave you without hot water when you need it most.
When to Drain Your Hot Water Heater
Learning to flush a water heater is a vital part of annual maintenance. It’s also recommended to flush your system when you notice a drop in water pressure, a decrease in hot water capacity, or unusual noises coming from the tank.
Flushing sediment ensures your water heater functions efficiently and minimises issues throughout its operational life. You’ll prolong its lifespan and prevent more costly repairs down the road.
Drain your system if:
- Water appears discoloured or cloudy
- You find leaks around valves or pipes
- The hot water smells foul or sulphurous
- Tank makes popping, crackling or rumbling noises
Besides clear signs of trouble, an annual flush to eliminate mineral deposits prevents performance decline. Understanding how to drain and maintain your pipes within the unit guarantees smoother operation and extended lifetime.
Remember, regular draining is essential, especially for electric systems and tank-based units, to ensure the tank remains free from sediment. Should confusion reign supreme, it’s wise to employ a professional to appraise and sustain your complete household plumbing, particularly when you drain the tankless water heater.
Safety Precautions Before Draining
When getting ready to drain your heater tank, safety should always be your top priority. Ensure the following safety measures are in place before starting:
- Turn off the power supply by switching off the circuit breaker for electric models or the gas valve for gas units.
- Turn off the water supply and let the hot water cool for several hours to mitigate scalding risks before drainage.
- Turn off cold water supply - This step prevents fresh water from entering the tank during drainage. Locate the shutoff valve for your hot water tank on the cold water supply pipe.
- Open a hot water faucet - Releasing pressure enables water to drain out of the tank faster through the hose.
- Wear protective gear - Safety glasses and gloves help prevent burns or eye injuries from splashes.
With your water heater off, power, water supply and piping secured, you can safely attach a garden hose and begin to drain hot water from the tank. But if in doubt, contact a professional to carry out the process safely.
Locating the Drain Valve
The drain valve is typically located bottom of the hot water heater. Start by positioning a container beneath the valve to catch the initial burst of water.
The drain valve is situated between the cold water inlet and the hot water outlet pipes.
At the base, two pipes are visible - the cold water inlet valve and the hot water outlet.
The drain valve will likely be a hose bib, garden hose thread or ball valve. Please note, ensure the valve turns freely before attaching your hose. If it’s stiff or stuck, spraying lubricant oil into the valve can help loosen it.
With your garden hose attached and drain container in place below, you are ready to start the process to drain once all power and water supplies have been turned off according to proper safety precautions.
Turning Off Water and Power
Before you drain your water system, it is crucial to turn off both the water supply and power to avoid potential injury or damage.
To turn off the water, locate the shutoff valve on the cold water inlet line. This valve, your mechanism to manage the water flow, is frequently positioned near the top end of the tank or where the water line enters. Turn the valve clockwise to fully close it.
For gas heaters, carefully switch off the gas supply to ensure safety during the flushing routine. With a gas heater, adjust the gas control valve to the "pilot mode" or "off" setting to enable a secure method of flushing hot remnants from the system.
Ensuring both water and power are securely off prevents accidents and allows you to drain the tank properly. The system can then safely engage in flushing your water through the attached garden hose.
Step-by-Step Guide to Draining
Here’s how to drain your hot water system correctly:
- Attach a garden hose to the drain valve at the bottom of your unit and lead it to an appropriate drainage area after shutting off the cold water supply.
- Place a bucket underneath the drain valve to catch the initial rush of water discharge.
- Open the highest hot water tap in your home to allow air into your tank and release pressure, enabling the water to drain out faster.
- Slowly Open the drain valve by turning it counterclockwise, and observe the water coming out.
- Ensure the tank drains completely by turning off the cold water once water flows steadily through the hose.
- If needed, back flush the tank by pouring clean water into the inlet to wash out any sediment until the water runs clear.
- When finished, close the drain valve and detach the garden hose.
- After refilling the tank, restore power to resume normal water heater operation.
- Top up the tank by turning on the cold water inlet until the tank overflows from an open hot water tap.
Annual hot water tank drainage is time-efficient and ensures system efficiency. Reach out to an experienced professional should you need to do the draining yourself effectively or when addressing electric hot water heater maintenance.
Attaching a Hose and Redirecting Water Flow
To drain the hot water tank, you will need a standard garden hose that can be securely attached to the drain valve outlet.
First, inspect the drain valve and hose bib to ensure there is no debris that could obstruct flow. Make sure the threads on the valve and hose are properly aligned to allow a tight connection.
Firmly screw on the garden hose clockwise and tighten by hand. Use pliers if necessary to get a good seal. Verify that the hose is securely fastened. This could be a lawn, garden bed or storm drain designed for water discharge.
Position the opposite end of the hose in an area where hot water can be directed safely from the bottom of your tank, clear of any buildings, pathways, or land.
Position the hose to slope downward, avoiding any kinks that may impede water flow. Turn the water valve to a need shut off position until ready to begin full drainage as all safety precautions are in place.
Briefly open the drain valve to ensure the hose is secure and the water flows through the drainage path adequately.
Opening the Drain Valve
When ready to open the drain valve, first check that all safety precautions are in place - water heater off, and power and water are off, hose is attached, and hot tap open. keep a hand near the hose end to sense when the water starts to flow steadily from the tank. Then, slowly turn the drain valve counterclockwise to open it.
Opening the valve too fast may cause hot water to jet out unexpectedly. So turn gently and only about a quarter turn to start. This allows air to enter the tank and the initial water discharge to begin flowing.
If the valve is stiff and hard to turn by hand, use an adjustable wrench to loosen it up. Take care not to over-tighten or damage the valve. Continue turning slowly until fully open once water begins flowing steadily through the hose.
Allow the tank to drain completely until the water coming out slows to a trickle. When finished, you can also reverse the process by turning the valve clockwise to close it back up.
Flushing Out Sediment
After fully draining the hot water tank, sediment may still remain stuck to the bottom and sides. Flushing helps remove any lingering mineral deposits or debris.
To flush your hot water system properly, close the drain valve and disconnect the garden hose. Attach your garden hose to the cold water inlet, securing it tightly to guide the water through hose directed into a drainage area. Place the other end in a container or bucket.
Turn the cold water supply back on so fresh water begins flowing into the tank again.
Continue refilling the tank until water flows from the hose into your bucket, showing clear signs of progress. Let approximately 5 gallons run out before closing the cold water supply again. Repeat as needed until the flush water runs clear with no debris.
This process effectively rinses away any remaining sediment.
Once finished, shut off the flushing hose from the cold inlet. Reattach your drain hose and resume the tank drainage process until all water runs clean. Annual flushes keep efficiency and performance optimal.
Closing Valves and Refilling the Tank
Once the hot water tank is fully drained, the subsequent steps involve closing the drain valve and detaching the garden hose. Make sure to securely turn the drain valve clockwise to close it completely. Then, close the tap and disconnect the hose from the drain valve.
With the directive to close drain valve actioned, turn the cold water supply back on to start refilling the tank with fresh water. Open the highest hot water faucet in your home to let air in and expedite water flow into the tank.
Allow the tank to brim up until tap water flows out from the open outlet, a sure sign that heater drain is effectually accomplished. This ensures any remaining air pockets are pushed out by the incoming water. Switch off the hot water tap when the tank is full and the flow from the faucet ceases.
Important: Do not turn the power supply back on until the tank is 100% refilled with water. Energising heating elements before submersion can cause permanent damage.
Once full, reinvigorate the electric circuit or engage the gas valve to “On” position, as your system prepares to warm up, ensuring your thermostat pilot guides the reheating, preceding a post-drain flush of your water, setting to the pre-determined temperature for ensuing use.
Restoring Power and Checking for Leaks
After fully draining and refilling the hot water system, the next step is to restore power, especially if you had to drain water heater specifically. For the electric variety, carefully turn back the circuit breaker switch. For a gas system, turn the gas control valve to the "On" position.
Prior to reinstating regular use of the water heater, meticulously examine all components, ensuring the integrity of the system post drain flush. Look closely around the drain valve, cold water inlet and hot water outlet. Any dripping or seeping water indicates a problem that needs to be addressed.
It’s a good idea to conduct this leak test before reigniting the pilot on any gas heater. Catching leaks early prevents water damage and ensures all previous work draining the system was done properly without dislodging pipes or components.
If no leaks found, your tankless water heater can be put back into service once the water reheats to the desired temperature. Just continue monitoring closely each time maintenance is performed.
Maintaining Your Hot Water System
To maintain the efficiency of your hot water system over the long term, follow the manufacturer’s recommendations and any other maintenance guidelines. This commonly involves replacing the anode rod every 3-5 years to prevent corrosion, flushing the tank annually to remove sediment, and periodically inspecting valves, pipes and seals for leaks. Consider having professionals conduct thorough system checks every few years to identify and address minor problems before they become major.
With some straightforward, preventive care, such as regular flushing of water from your storage tank, you’ll enhance both performance and durability.
When to Call a Professional Plumber
While draining a hot water system is often a straightforward DIY task, it’s advisable to call a professional in certain situations:
- If you have an electric hot water system - Turning off power and draining requires expertise to avoid damage or injury
- If you encounter leaks, odd noises or any problems during the process
- If draining multiple times fails to clear sediment or performance issues persist
- For annual servicing to maintain efficiency and longevity
- If the drain valve is stuck closed and difficult to open
- For replacing, repairing, or installing hot water heaters or related plumbing
Our licenced plumbers, serving the Gold Coast and beyond at North Mead Plumbing, can expertly tend to pilot light issues and have the proper tools, training, and experience to address any hot water system issues. Should any concerns emerge, feel free to call us for professional support in upkeeping or resolving issues with your unit.